Ok so... much has happened since I last posted. In short I finished my work and got down to sailing every free moment I could find. This turned out to be something to the tune of 2 - 4 days a week with lots of camping trips in there. I continued to take pics so I'm going to post the remaining repair pics and just tell about each step of the way. Then I'll start a new post for the various trips I have pics of. So here it goes...

I left off last post having stripped the keel of each hull and from there I let them dry under cover of a inexpensive tarp carport bought on Amazon for something like 80 bucks. It was excellent for the 5 - 6 months that I needed it and it lasted for about 4 more before the tarp material degraded to the point of literally falling apart at a touch. Still not a bad buy for a temporary project and now a have a steel frame for a quick green house over my garden in the spring.
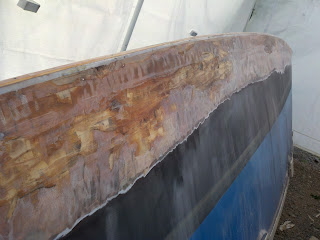 The de-lamination at the keel weakened the glass quite a way up the hull side in some places. I stripped anything away that came freely since it was no longer providing any of the strength or protection it was meant for and roughed up the wood underneath and allowed it to dry. None of the wood felt wet to the touch but laying plastic wrap sealed over various sections revealed that moisture was indeed escaping. So I continued to let it dry and occasionally sprayed the wood with acetone to aid the evaporation action.

After a month or so of drying I painted each hull with
Raka epoxy sealing the wood. I then layered 2 layers of 6oz fiberglass cloth overlapping the old glass on the hull sides to ensure a complete seal and as much strength as possible. Next I glued down a layer of
1708 biaxial tape along the keel edge to take the abuse of repeated beaching and/or any accidental groundings. This made the keel quite a bit beefier and much much stronger. There are a few other pics I'll add to show different angles and stages of the glassing stages.


Next came the job of fairing the thick biaxial tape to hull. This entailed 2 or 3 rounds of spreading fairing compound over any low areas in the glass and using a plastic drywall spatula scraping off any excess. This spared me quite a bit of sanding as only a minimal amount of fairing compound was left after scraping and most of it being at the edge of the biaxial tape. After a few rounds of sanding and filling the hulls were quite fair and I was ready to start painting the surface with epoxy to finish filling in the weave and creating a smooth and even surface. I also made sure to thoroughly scrub the entire surface with acetone if the epoxy layer was ever allowed to fully cure before the next coat. This was to insure that any amine blushing couldn't spoil the bond between coats.
Here are a few more shots and angles...
Finally I decided that if I was going to paint the bottoms I might as well give the topsides a couple of coats too. I scuffed up any painted areas that I intended to paint over and then washed both hulls with dish soap and water. After they dried I wiped them down with acetone to remove any waxes or oils that still remained. Next both hulls were taped off and painted. I first painted the topsides the same
Brightsides ocean blue. I used the roll and tip method which gave amazing results but I'd recommend having a partner to follow behind and tip. I was lucky to have my girlfriend Julia Nance there to help. She was also kind enough to protect the boats name and Wharram symbols by taping over them and cutting away the excess with an X-acto knife. This allowed them to be painted over without worry only having to peel the tape off once dry. Once the final coat was dry I pulled all of the tape and re-taped for the painting of the bottoms. The bottom paint I chose was the
Interlux Fiberglass Bottomkote NT this is a blend of hard coat technology and ablative. The result is a very durable bottom paint that self cleans. It also had the added bonus of a very very easy application and super quick dry time of 30 min. This made painting the bottoms go very quickly.
Again here are a few more shots of various stages and angles.
Next came the beams, decking, and well basically everything else. All of it was thoroughly cleaned and prepped and painted in Interlux's 4208 Hatteras Off White. I seem to have lost alot of the pics taken of this process and not many were taken during this stage as is was the end of May and the weather and wind were really nice. My focus was to finish and get my butt out on the lake sailing and that's what i did. My following post will be on many sailing trips I took at the lake over the summer. Sorry it took me so long to post.

 I left off last post having stripped the keel of each hull and from there I let them dry under cover of a inexpensive tarp carport bought on Amazon for something like 80 bucks. It was excellent for the 5 - 6 months that I needed it and it lasted for about 4 more before the tarp material degraded to the point of literally falling apart at a touch. Still not a bad buy for a temporary project and now a have a steel frame for a quick green house over my garden in the spring.


